
SWITCH ON THE MICROSCOPE
Before switching on the microscope, plug-in the microscope to the power supply (1). Once this is done, switch it on (2) and gradually increase the intensity control (3).

INTERPUPILLARY DISTANCE ADJUSTMENT
Before adjusting the interpupillary distance, place the sample on the specimen holder, and select the 10X objective (4).

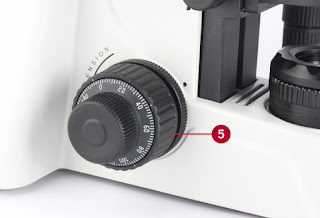
Focus the sample by using the coarse focusing knob, which is located on the left side of the microscope’s stand (5).

Then, adjust the interpupillary distance so that both the right and left field of view become one image. This adjustment will allow the user to observe the specimen with both eyes (6).

DIOPTER ADJUSTMENT

DIOPTER ADJUSTMENT
The diopter adjustment compensates any differences in vision between the left and the right eye.
Look through the eyepiece on the right side with your right eye (7).


Focus the image by using the fine and/or coarse focusing adjustment knobs until the image of the specimen is sharp (8).


Then, look through the eyepiece on the left with your left eye. Use the diopter’s adjustment ring to focus the sample until the image of the specimen is sharp (9).

The microscope is now ready for perfect binocular viewing, according to the user’s dioptres, providing an accurate visualisation of the specimen.

CONDENSER ADJUSTMENT (for microscopes with Koehler Illumination)
Note: Other models without Koehler illuminator are supplied pre-centred.
To ensure optimal and homogeneous Koehler illumination, we need to make sure that the specimen and the Koehler diaphragm are both in focus. For this procedure, we recommend using the 10X objective.
First, focus the sample. Then, close the aperture of the diaphragm of the Koehler illumination (10).
Now, focus the diaphragm moving the condenser up or down using the condenser’s focusing knob (located under the mechanical stage on the left hand-side of the microscope) (11).
Now, focus the diaphragm moving the condenser up or down using the condenser’s focusing knob (located under the mechanical stage on the left hand-side of the microscope) (11).


After all of this is done, open the aperture of the diaphragm. Now the illumination should be homogeneous on the whole field of view (13).
CONDENSER ADJUSTMENT OF THE IRIS DIAPHRAGM
Note: When using the 100X objective, position the iris diaphragm aperture knob to the 0.9 value on the scale (or 100X engraved).
It is necessary to match the NA value of the objectives with the aperture of the iris diaphragm condenser.
Numerical Aperture is commonly used in microscopy to describe the angle of the cone of light that can enter or exit the objective lens; hence its light-gathering ability and resolution.
Align the aperture of the iris diaphragm ring matching it with the NA value on the scale (15). The scale value should match the NA number engraved on the objective (14), (some condensers show the position determined for each objective: 10X, 40X, etc,...).


USING IMMERSION OIL OBJECTIVES
Caution: Remove any air bubbles from the nozzle of the oil ampoule before use. Immersion oil must be used sparingly. After its use, the oil should be wiped off the 100X objective with a lens cleaning tissue, and the residual film should be removed with a solution made of ether (70%) and alcohol (30%).
Focus the sample with the 40X objective, locate your area of interest, and move the objective away from the light path (16).

Add one drop of immersion oil on the sample, and move the 100X objective on the light path (17).


You will see that the oil will form a column-shaped drop between the sample and the objective’s lens (18).


Use the fine focusing knob to sharpen the image. Ensure no air bubbles have formed (19).


If you want to know more about our products, visit our Support Zone at
No comments:
Post a Comment